What controls Turbo Core in Xeons?

Page 43 - Seeking answers? Join the AnandTech community: where nearly half-a-million members share solutions and discuss the latest tech.

sciff

Member
Mar 6, 2017
136
52
71
Guys, I have a question for you. Since it seems possible to unlock turbo-boost witout EFI hack, is it possible to achieve the same for Broadwell CPUs? By deleting Broadwell microcode from BIOS, and then setting Vcore offset, Vcache offset and maximum turbo multiplier? Will it work? Or this way of unlocking the CPU still depends on an error in it which Broadwells don't have?

Does anyone have a single CPU system with a ASUS or Gigabyte motherboard and a Broadwell CPU to check that?
 

sciff

Member
Mar 6, 2017
136
52
71
I just loaded up the very latest efis posted in the last few pages of this thread, and now all my cores are basically locked at 3149 mhz. they dip down for a second here and there but other wise theyre all locked. nothing like the variance I was getting before. so happy! thats awesome! thank you all for this thread!
Don't you care that by being locked at the maximum frequency your CPU doesn't save any power? Turbo unlock perfectly works with EIST enabled (allowing the CPU drop to x12 in idle).
 

DRM8626

Junior Member
Jul 14, 2017
3
0
6
Don't you care that by being locked at the maximum frequency your CPU doesn't save any power? Turbo unlock perfectly works with EIST enabled (allowing the CPU drop to x12 in idle).
why would I care about power? serious question. the cpu is sitting at 32 c.
 

pututu

Member
Jul 1, 2017
147
223
116
why would I care about power? serious question. the cpu is sitting at 32 c.
Not for you but for me I'm running distributed computing project, so pretty much 24/7. See my earlier post #990.

Using HWinfo64, the CPU is showing 100W consumption at 3GHz for all 28 threads (2683v3). What did you get for yours? I'm unable to reduce the Vcore on my Asrock X99M Killer motherboard. A bit disappointing for this motherboard unless someone can show me how to do this on my motherboard. Thanks in advance.
 

sciff

Member
Mar 6, 2017
136
52
71
pututu, try to install this application and use it:

f27nsXxTvIU.jpg
 

pututu

Member
Jul 1, 2017
147
223
116
pututu, try to install this application and use it:

f27nsXxTvIU.jpg
Thanks for the suggestion but I've already tried it per my earlier post#990 and it also didn't work with several efi files posted here.The F-stream won't respond to my selection.
From what I read, modifying it in the efi file will likely work but I've no experience unless someone point me to a good website. I also tried Dufus post#999 but during compilation, I got an error which I'm suspecting is missing "efi3.inc" include file. If all else fails, I guess I would have to live with high power consumption...
 

CANONKONG

Member
Jul 11, 2017
98
62
46
Thanks for the suggestion but I've already tried it per my earlier post#990 and it also didn't work with several efi files posted here.The F-stream won't respond to my selection.
From what I read, modifying it in the efi file will likely work but I've no experience unless someone point me to a good website. I also tried Dufus post#999 but during compilation, I got an error which I'm suspecting is missing "efi3.inc" include file. If all else fails, I guess I would have to live with high power consumption...
Can you help me to modify the V3.EFI,because only V3.EFI can work well when it was a ffs file,I just want the V3.efi change the Vcore offset & Cache offset from -20mv to -70mv!
 

CANONKONG

Member
Jul 11, 2017
98
62
46
Can someone help me to modify the V3.EFI? Because only V3.EFI can work well when it was a ffs file,I just want the V3.efi change the Vcore offset & Cache offset from -20mv to -70mv! Please!
 

Dingmel

Junior Member
Mar 16, 2017
19
0
66
hey there fellas. been a while since my last post. I had the original V3 loaded onto my setup (2683 v3 on a RVE), with microcode 0x27 loaded. Was running 3Ghz with no issues for several weeks/months.
my windows got borked a few days ago, and I had to do a reinstall. Once everything was up, I reloaded the microcode with 0x27. Weirdly, now when I run loads, my multiplier goes up to 29-30x, for a second, then settles at 27, that's on cinebench, non avx.
Any ideas?

Looks like there have been a couple of updates to the original V3 and the microcode. Anyone have a combo that works better? Thanks !
 

C_Payne

Junior Member
May 16, 2017
22
11
41
Only v3.efi can work well when it was a ffs file package into the bios,other efi will cannot work if package iinto the bios.
I have the same issue here.

Can someone help me to modify the V3.EFI? Because only V3.EFI can work well when it was a ffs file,I just want the V3.efi change the Vcore offset & Cache offset from -20mv to -70mv! Please!
I am quite sure i can manage that.
I will set up fasm sometime this week and try myself out. Bad thing is that i am only doing this remotely on a friends machine so debugging suxx.

@Welsper @randir
I would love if you would reupload your sources, so i can try to find out why i cant include them as ffs modules and/or add changes for dual CPU boards to my modified v3.asm
Also i would like to see how you append uCode.
 

xma

Member
Apr 19, 2017
34
4
71
ASUS can work without EFI,I suggest you use bios remove Microcode,set up the cpu radio in bios,and you can set cpu core voltage-50~-70,it will get higher frequency.

I understand that but I want to try a mod bios with V3.efi integrated to see if it will stop the dropping in the uncore frequency. In addition, the motherboard I have does not boot to UEFI shell I tried everything but it will not boot to UEFI shell. will you please make a mode bios for ASUS X99-E WS/USB 3.1 with V3.efi packaged without vdrop
 

xeon_fan

Junior Member
Jul 25, 2017
19
0
66
First of all I would like to say Hello to all (as it is my first post :) )
is there any reason to apply this change to e5 2697 v3 QGN3 [QS]. I'm not at home but from what I have remember it is 3.1 GHZ with all cores turbo and 3.6Ghz with 2. Will there be any gain [like locked turbo at 3.6 Ghz for all]?
With minor blck overclock [taichi x99] I was able to manage quite nice results:
http://www.userbenchmark.com/UserRun/4394913
or in cpu benchmark:
https://www.passmark.com/baselines/V9/display.php?id=86391845136
over 2150 on one core.

It's my fourth xeon [started with 771 socket :) ]

Let me know if there something to get :)

Thank you
 

goldserve99

Junior Member
Jul 25, 2017
1
0
11
Hi Guys, I'm still trying to make sense of things but if I have a SM X10SRH-CLN4F motherboard with a E5-2630L processor, what tools or where can I download a modified bios to enable max turbo frequency when all cores are active. I read that I have to boot into EFI shell to apply a specific microcode patch? What if I am running ESXI on this machine. It would be fantastic if there was some wiki I could follow but thanks in advance to your replies.

Cheers!
 

CANONKONG

Member
Jul 11, 2017
98
62
46
I have the same issue here.


I am quite sure i can manage that.
I will set up fasm sometime this week and try myself out. Bad thing is that i am only doing this remotely on a friends machine so debugging suxx.

@Welsper @randir
I would love if you would reupload your sources, so i can try to find out why i cant include them as ffs modules and/or add changes for dual CPU boards to my modified v3.asm
Also i would like to see how you append uCode.
I tried many test to change v3.efi,but I don't know how to build UDK EDK II. Itried to change the efi with Hex,but I failded.
 

kjboughton

Senior member
Dec 19, 2007
330
118
116
Anyone has figured out how to remove the microcodes from bioses who don't work with UBU (Error in Replacing File)? I tried with MMTool too without sucess, doesn't let me save the modded bios, it is a X99 SOC Champion one.

Yes.

WARNING: ALWAYS BACKUP UNMODIFIED BIOS TO A SAFE LOCATION BEFORE PROCEEDING

Part 1: Manually modify BIOS to allow for the use of UBU/MMTool to *remove* unwanted CPU microcode patches from BIOS ROM

1) Open .ROM using UEFITool (File -> Open image file...). Can be .CAP or .ROM as UEFITool is capable of working with either
Note: For .CAP file, right-click "AMI Aptio capsule" and select "Extract body..." and save as raw ROM of same name as parent .CAP file. Open this .ROM in UEFITool to continue...

2) Select File -> Search... and goto GUID tab and paste in "1BA0062E-C779-4582-8566-336AE8F78F09" (select Header only for scope)

3) Double-click search result hit in Messages section (lower window)

4) Right-click "1BA0062E-C779-4582-8566-336AE8F78F09" in Structure window and select "Extract as is...". Save as "1BA0062E-C779-4582-8566-336AE8F78F09.ffs" and leave UEFITool open in background

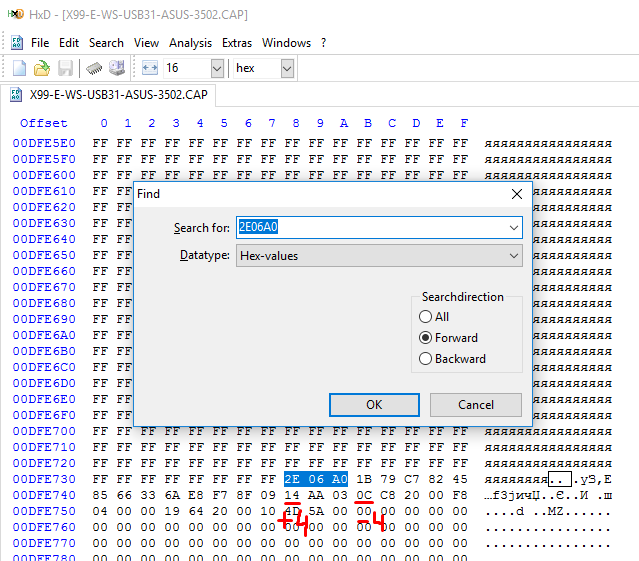
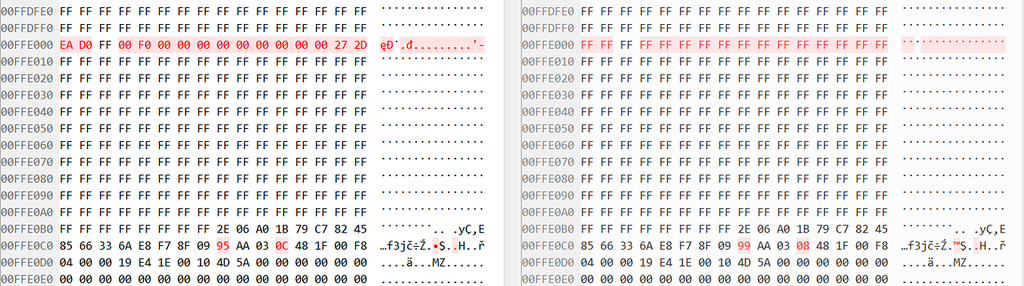
5) Open 1BA0062E-C779-4582-8566-336AE8F78F09.ffs using your favorite Hex Editor and change 0x13 from "0C" to "08". Save and close

6) Back in UEFITool right-click "1BA0062E-C779-4582-8566-336AE8F78F09" in Structure window and then time select "Replace as is...". Select file "1BA0062E-C779-4582-8566-336AE8F78F09.ffs" as modified in step 5. You should now see Remove of SEC core followed immediately by Replace of SEC core in Structures window, the only difference being Attributes: 08h set now in place of 0Ch

7) File -> Save image file... (replace existing or save as new). When asked "Open reconstructed file?" click "Yes". Search for same section ("1BA0062E-C779-4582-8566-336AE8F78F09" and verify Attribute in Information window to right shows "08h". Quit UEFITool

-- If all you seek to do is remove protection from the BIOS for write permission to *remove* CPU microcode, you are done.

-- If you need help to continue to modify your BIOS to remove said CPU microcode, follow either Part 2A or Part 2B below, do not do both.

Part 2A: Remove unwanted CPU microcode using UBU (PREFERRED)

1) Place modified BIOS (per Part 1) in UBU folder. Delete "tmp" folder and "bios.bin" file from local folder if present. Open Command Prompt in this window or open Command Prompt and navigate to this folder. Run UBU.bat and wait for results to complete

2) Observe warning "There may be problems with updating the CPU microcode" (ahhh, yes... indeed). Press any key to continue

3) Select "7" (Update Intel CPU MicroCode) and press Enter

4) Select "1" (Update CPU MicroCode Haswell-E and/or Broadwell-E) and press Enter

5) For Broadwell-E select any option except "0" (Skip) and press Enter

6) For Haswell-E selection "0" (Skip) and press Enter

Observe:
Remove "Empty" module.
Update Microcode Patch...Ok!
Restore "Empty" module...

7) Select "0" (Exit) and press Enter

8) Select "1' to rename as appropriate followed by Enter and you're done. This file is ready to be flashed to your MB using conventional means (go to Part 3)

Part 2B: Remove unwanted CPU microcode using MMTool

1) Launch MMTool and select "Load Image" and navigate to your modded BIOS (per Part 1).

2) Go to "CPU Patch" tab. Select "Delete a patch" from Patch Option, highlight line with CPU microcode to be removed and click Apply. Hint: for V3 Full Turbo remove anything with CPU ID of "06F2". There are some that remove removing CPU microcode for "06F1" stepping CPUs will cause fail to POST. Answer "Yes" to warning regarding BIOS failure

3) Click "Save Image" and observe no errors in saving. Close and re-launch MMTool, load your modded BIOS and confirm CPU microcode properly removed

IMPORTANT: YOU MUST LOAD AND QUIT USING UBU FOR THIS FILE OR YOU MAY OBSERVE FAIL TO POST

Here's how:

1) Place modified BIOS (per Part 1 and Part 2B) in UBU folder. Delete "tmp" folder and "bios.bin" file from local folder if present. Open Command Prompt in this window or open Command Prompt and navigate to this folder. Run UBU.bat and wait for results to complete

2) Observe warning "There may be problems with updating the CPU microcode" (ahhh, yes... indeed). Press any key to continue

3) Immediately select "0" (Exit) and press Enter

4) Select "1' to rename as appropriate followed by Enter and you're done. This file is ready to be flashed to your MB using conventional means (go to Part 3)

Part 3: Flash

a) If you are using an ASUS board you cannot use EZ Flash as it requires a .CAP file which cannot be created without AMI's private signing key which means either BIOS Flashback (first downgrade to earlier BIOS) or other AMI Flash tools (like AFUDOS)

b) Alternatively, buy a cheap ($10) CH314A SPI programmer on eBay and flash what you want, when you want...

-FCG
 
Last edited:

sciff

Member
Mar 6, 2017
136
52
71
kjboughton, wow, your answer to a four-month-old message is so on time :D

There's a much faster and simpler way of removing protection from a BIOS file so that UBU could process it.

mike999, you have to edit the original BIOS file in a hex editor first and only then pass it through UBU.

Use search function inside it and search for "2E06A0" hex value and then edit the file by adding 4 right below "2E" and subracting the same value three to the right. This way securecode feature of the BIOS file is disabled. But be careful, the searched part should be towards the end of the file and there can be two instances (in case of ASUS BIOS there usually are two), edit both. If you also find "2E06A0" somewhere in the beginning or in the middle of the BIOS file, ignore it, it's just a coincidence.


In this case, as a result I got 18 instead of 14 and 08 instead of 0C
P.S. don't forget to agree to rename the .CAP file for ASUS Flashback, when you get asked by UBU at the very end.
Then proceed to UBU.

I can assure you that I've modified about 30 different BIOSes for different people this way, and I have not received a complaint yet. This method works.
 

kjboughton

Senior member
Dec 19, 2007
330
118
116
kjboughton, wow, your answer to a four-month-old message is so on time :D

There's a much faster and simpler way of removing protection from a BIOS file so that UBU could process it.


Then proceed to UBU.

I can assure you that I've modified about 30 different BIOSes for different people this way, and I have not received a complaint yet. This method works.

Makes sense: instead of finding and removing (and then replacing) the actual section with the attribute to be changed you are simply searching for a signature and doing the same.
0Ch - 04h = 08h... this is the single section attribute that needs to be changed to allow modification using either tool
The difference being that when you add the modified section back in to the ROM address space the tool automatically computes and applies the proper checksum. Your method evades this by adding back (+4) the same value that is reduced (0Ch -> 08h is subtraction of 4). Furthermore, your method potentially affects an *undefined* change to a file offset location which while having no apparent effect today may not continue to hold true in the future.

While this appears to work, what I have provided is more *general* in instruction and will allow for future adaption of principle of application should this protection mechanism continue to evolve.

-FCG
 
Last edited:
  • Like
Reactions: sciff

sciff

Member
Mar 6, 2017
136
52
71
kjboughton, I came across this method here: http://www.win-raid.com/t18f16-Guide-Manual-AMI-UEFI-BIOS-Modding-4.html#msg21755

It wasn't a critique per se, but rather suggestions to improve it or avoid mistakes. For your particular case, item nr. 3 was the problem. To have UBU support, you just have to remove FFS_ATTRIB_FIXED (useless on Volume Top Files), in other words, change file attribute from 0C to 08. You could do this with UEFITool, by extracting 1BA0062E-C779-4582-8566-336AE8F78F09 and in that file change offset 0x13 from value 0C to 08, save the file, then replace it. The problem is that UEFITool will also remove the trampoline for recovery (CodeRush can offer more details). To avoid this, open your E7883IMS.110 file in hex editor and change offset FFE0C8 from 95 to 99, then change offset FFE0CB from 0C to 08. You can double check the result with UEFITool. After this change, your file will work in UBU for microcode update. See the picture bellow, you need to change only the two values, but keep the top red line unchanged.

0_155d67_42a836b7_XXL.png

How is your build? Have you tried unlocking your amazing Xeon duo? :D
 
Last edited:

kjboughton

Senior member
Dec 19, 2007
330
118
116
I am right in the middle of my v3 build and was researching OC methods when I can across this thread.

Current WS is a dual E5-2697 v2 that I've pushed to a BCLK of 112 for a top turbo of 3.36Ghz for all cores.
I've managed to POST and boot into Windows at 114 BCLK; 115MHz or more causes a BIOS corruption or POST loop failure that requires me to swap out a whole new BIOS chip and so I've become quite adapt at modding BIOS' and the such...

That v2 build is under a custom watercooling loop. The v3 build in my sig (in process) will be almost exactly the same except for Haswell over IVY-B.
 
Last edited:
  • Like
Reactions: txgy and sciff

sciff

Member
Mar 6, 2017
136
52
71
kjboughton, wow, double E5-2697 v2 must have cost you a fortune! Even though the platform is obsolete, the Ivy Bridge Xeons, especially with such frequencies, are still rare an expensive...

As for your new rig on C612. Is there some way you could test it in Corona Render with both CPUs fully unlocked? (by that I mean working at all-core turbo 3.2-3.4 GHz even in AVX/AVX2, which causes the CPUs to consume up to 240 W of power)

My second E5-2696 V3 will arrive soon and I'm planning to buy this exact motherboard, ASUS Z10PE-D8 WS. But I have a suspicion that I will have to start using efi exploits with µCU integrated, which causes AVX/AVX2 turbo to drop from full 3.2-3.5 to reduced 2.7-2.9 GHz

By the way, what revision of the motherboard do you have?
 
  • Like
Reactions: txgy

kjboughton

Senior member
Dec 19, 2007
330
118
116
Has this not been confirmed to work on 2P?

My first concern was that this V3.efi driver may need to be modified for the number of cores/CPUs given first release was likely a point solution. Has that code not been published?

Second, are you saying that you suspect loading the EFI drives will not be good enough to affect this change on SMP systems? That it will need to be integrated into the BIOS more fully?
 

sciff

Member
Mar 6, 2017
136
52
71
kjboughton, a whole bunch of dual-CPU efi exploits has been published and they do work. My concern is that ASUS Z10PE-D8 WS will not be able to provide twice 240 W of power for two unlocked E5-2696 V3 when no microcode is being loaded one way or another (e.g. via VMWare microcode updater). When you unlock a V3 Xeon and use no microcode update at all, the CPU works at the same turbo frequencies regardless of AVX/AVX2. With AVX/AVX2 TDP can become pretty high. I use Corona Render, which fully emloys AVX2 extensions.
 

kjboughton

Senior member
Dec 19, 2007
330
118
116
kjboughton, a whole bunch of dual-CPU efi exploits has been published and they do work. My concern is that ASUS Z10PE-D8 WS will not be able to provide twice 240 W of power for two unlocked E5-2696 V3 when no microcode is being loaded one way or another (e.g. via VMWare microcode updater). When you unlock a V3 Xeon and use no microcode update at all, the CPU works at the same turbo frequencies regardless of AVX/AVX2. With AVX/AVX2 TDP can become pretty high. I use Corona Render, which fully emloys AVX2 extensions.

I don't think it's possible to run w/o uCode, the BIOS is able to operate w/o uCode however uCode is required to enter Protected Mode.
As you are aware, Windows 7/8.1/10 all provide uCode updates at load regardless of what is in the BIOS and asserted during boot.
The whole point of this exploit is to apply the proper MSR values (using EFI environment) so that when (not if, when) the uCode is applied (either by Windows or by the VMWare driver) it is not possible to revert the changes. Intel makes these setting write-once, read-only so if anything writes a wrong value... whoops! too late to take it back (which is the whole principle of operation being discussed here).

Edit: Also thought it worth mentioning that it only makes sense that CPU microcode is instatiated in actual circuitry (how else could the uCode by "updated" as the CPU is required to process the instructions necessary to conduct the update... oh no, I've gone cross-eyed). What is being loaded is a Microcode patch. Patch.

-FCG
 
Last edited: