BoomerD
No Lifer
- Feb 26, 2006
- 66,311
- 14,720
- 146
don't ever buy cheap screws. not worth it. GRK is geat, SPAX is also good, and for bigger stuff i use the fastenmaster xxxlok stuff.
SPAX is my go-to for construction screws.

don't ever buy cheap screws. not worth it. GRK is geat, SPAX is also good, and for bigger stuff i use the fastenmaster xxxlok stuff.


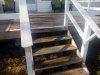
If I am looking at your initial pictures correctly, it appears that the existing stair stringers are actually more triangular in shape, resting on concrete from the edge of the deck to the end of the stairs (i.e. not like your diagram). If you are replicating the existing design then the stringers themselves provide all the support for the stairs; they can effectively be an independent free-standing structure. If so, then the connection to the deck only needs to be strong enough to prevent the stairs from moving horizontally (no vertical load), and I don't think you need a bigger ledger board or that particular metal hanger. But I will defer to Greenman.

I'd just add, that I don't know your age so -
My mother in her later years used a walker. To accommodate this I made the stair steps on my decks with a 4" rise and a 22" run.
This meets codes and allows the safe use of a walker without having to use a ramp.
Additionally all our younger friends always comment on how much more comfortable those steps are compared to the usual 7 5/8" risers.


I apologize for not doing a better job of explaining what I mean. What you are describing is the standard method of building longer runs of wooden steps and it will certainly work.
But for just two or three steps, there can be other approaches. Let's hope this picture is worth a thousand of my words!
View attachment 19029
The big difference here is that each step is directly supported from below and therefore does not rely on the attachment to the deck (or whatever) to hold them up (just needed to hold them in place if that's desired). What I see in your photos suggests to me that your two existing steps are built something like this with what I'll call "L" shaped stringers. If so (and there is already concrete to support their bottoms over their entire length) then this might be easier. But I could be wrong...
Looks like pre cut stringers from the depot would be very close at 6.75 inch rise, even better if your pad pitches away an inch or so.
Stringers are so easy to cut that there is no need to try and make something work. It requires a tape measure, a framing square, and a saw. If you really want to go pro, you can toss in a set of square nuts. Armed with those tools and some simple math, you can frame just about any set of stairs.Looks like pre cut stringers from the depot would be very close at 6.75 inch rise, even better if your pad pitches away an inch or so.
That's actually a very good solution for two or three treads, I've done something similar on occasion. I'm so locked into a process that I've done dozens of times that I never considered a simpler approach.I apologize for not doing a better job of explaining what I mean. What you are describing is the standard method of building longer runs of wooden steps and it will certainly work.
But for just two or three steps, there can be other approaches. Let's hope this picture is worth a thousand of my words!
View attachment 19029
The big difference here is that each step is directly supported from below and therefore does not rely on the attachment to the deck (or whatever) to hold them up (just needed to hold them in place if that's desired). What I see in your photos suggests to me that your two existing steps are built something like this with what I'll call "L" shaped stringers. If so (and there is already concrete to support their bottoms over their entire length) then this might be easier. But I could be wrong...
Fixed that for youStringers are so easy to cut that there is no need to try and make something work. It requires a tape measure, a framing square, and a saw. If you really want to go pro, you can toss in a set of square nuts. Armed with those tools and some simple math, you can frame just aboutany set of stairsanything.
If we're going to get picky about it we'd have to add a chalk line to the mix.Fixed that for you
Why ?If we're going to get picky about it we'd have to add a chalk line to the mix.
OP would need to handle 2x12 material, and the precuts are nearly perfect taking an inch off the bottom rise. Just a suggestion.Stringers are so easy to cut that there is no need to try and make something work. It requires a tape measure, a framing square, and a saw. If you really want to go pro, you can toss in a set of square nuts. Armed with those tools and some simple math, you can frame just about any set of stairs.


OP would need to handle 2x12 material, and the precuts are nearly perfect taking an inch off the bottom rise. Just a suggestion.
stairs can be intimidating. good work.