What controls Turbo Core in Xeons?

Page 55 - Seeking answers? Join the AnandTech community: where nearly half-a-million members share solutions and discuss the latest tech.

WantRamWithThat

Junior Member
Aug 17, 2017
2
0
1
I just want to say I love the work done by everyone here, while I am new I learned a lot about BIOS mods and microcode. Thanks @vercety for the tutorial way back, However I am a little confused now that @CANONKONG has these mod bios does that mean we no longer need to inject the microcode with that? Or does the mod bios only allow you to turbo up to 3.5? If there is a tutorial I would really appreciate it :)
 

CANONKONG

Member
Jul 11, 2017
98
62
46
I just want to say I love the work done by everyone here, while I am new I learned a lot about BIOS mods and microcode. Thanks @vercety for the tutorial way back, However I am a little confused now that @CANONKONG has these mod bios does that mean we no longer need to inject the microcode with that? Or does the mod bios only allow you to turbo up to 3.5? If there is a tutorial I would really appreciate it :)
if your system is win10,just flash the mod bios, and it will automatically work the highest frequency,but according to the TDP and the CPU's ASIC,different CPU have different performance. I wrote a tutorial about modify BIOS on page 54.
 

Bl@Ze

Junior Member
Aug 17, 2017
16
0
36
Hello together.

Anyone has a tweaked mod bios (Version 3407 = http://dlcdnet.asus.com/pub/ASUS/mb/Socket2011-R3/Z10PE-D16_WS/BIOS/Z10PE-D16-WS-ASUS-3407.zip) for the ASUS Z10PE-D16 WS with 2x 2699c v4 for all cores (possible only change the max. multi or higher turbo boost frequency?)

Default Values:
Base Clock = 2.2GHz
All-core Boost = 2.8GHz
Maximum Boost = 3.6GHz

By the way, it's possible to add the PCI-Bifurcation functionality?

Big thanks.

Gesendet von meinem SM-G930F mit Tapatalk
 
Last edited:

WantRamWithThat

Junior Member
Aug 17, 2017
2
0
1
if your system is win10,just flash the mod bios, and it will automatically work the highest frequency,but according to the TDP and the CPU's ASIC,different CPU have different performance. I wrote a tutorial about modify BIOS on page 54.
So if i use the mod bios then my cpu should just increase to the faster frequency without me injecting microcode? I am most likely just going to use your modified bios

And thank you, I am still new and I read your tutorial and understand it not well mind you as I have yet to buy the parts. I just wanted to know before hand
 

knopflerbruce

Junior Member
Mar 5, 2017
15
1
41
I ran the non-FFS BIOS (no idea what FFS even is in "computer terms"). It runs around 3.2-3.3GHz most of the time, with the occasional bounce to 3.5GHz, or down to 3.1GHz or so.
 

CANONKONG

Member
Jul 11, 2017
98
62
46
Can you also do me a bios with v3x2_50_vcc.efi introduced into the bios, without changing any voltage from what is efi?
That is to have -50v everywhere, including the offset voltage system agent?
Dual CPU don't work well with the ffs bios,I am still trying to make it work.
 

CANONKONG

Member
Jul 11, 2017
98
62
46
So if i use the mod bios then my cpu should just increase to the faster frequency without me injecting microcode? I am most likely just going to use your modified bios

And thank you, I am still new and I read your tutorial and understand it not well mind you as I have yet to buy the parts. I just wanted to know before hand
Yes,just flash the bios,don't need to add the efi driver and injecting microcode.
 

SZAO6

Junior Member
Feb 19, 2017
13
1
51
CANONKONG I have load the BIOS from You form my AsRock X99m 3.1 killer, but unfortunately it doesn't work well for me. First, I can't get higher with BCLK, even 101MHz is to high and gives me a bluescreen before the windows starts. With the first BIOS my PC works for a couple of months with 103.3MHz BCLK and even higher was stable. Now I get issues with Vray for sketchup. Multiple Cinebench test wasn't a problem, but real life rendering seems to be harder.
Can You tell me what's wrong? I still don't load a newer microcode, but I don't think this gives that problems. Maybe undervolting is too high?
 

CANONKONG

Member
Jul 11, 2017
98
62
46
CANONKONG I have load the BIOS from You form my AsRock X99m 3.1 killer, but unfortunately it doesn't work well for me. First, I can't get higher with BCLK, even 101MHz is to high and gives me a bluescreen before the windows starts. With the first BIOS my PC works for a couple of months with 103.3MHz BCLK and even higher was stable. Now I get issues with Vray for sketchup. Multiple Cinebench test wasn't a problem, but real life rendering seems to be harder.
Can You tell me what's wrong? I still don't load a newer microcode, but I don't think this gives that problems. Maybe undervolting is too high?
The mod bios both with -70mv Vcore offset,so I don't recommend to change BLCK,because the voltage cannot hold a high BCLK.And too much BLCK is bad for nvme SSD,it will make mvme SSD loss speed and damage.
 

Cata40

Member
Mar 2, 2017
156
6
81
Dual CPU don't work well with the ffs bios,I am still trying to make it work.
It works well for that bios, done for me, give the offset voltage system agent you put plus 100 and I think it gives me freeze
If you put me all over -70, as I prayed to you, I think he was excellent
 

CANONKONG

Member
Jul 11, 2017
98
62
46
It works well for that bios, done for me, give the offset voltage system agent you put plus 100 and I think it gives me freeze
If you put me all over -70, as I prayed to you, I think he was excellent
Which ffs did you injected into the bios? Now,I only can make one CPU work,another can't work.Or both can not worked.
 

BradKay

Junior Member
Jun 22, 2017
6
0
66

Thanks for all the resources you provided. you mentioned that with the bios you provided, we do not need microcode or efi correct?
But what if I already used the older method and installed .efi and used VMware stuff? Should I reinstall the windows to revert them and flash with your bios?

Thanks!
 

CANONKONG

Member
Jul 11, 2017
98
62
46
Thanks for all the resources you provided. you mentioned that with the bios you provided, we do not need microcode or efi correct?
But what if I already used the older method and installed .efi and used VMware stuff? Should I reinstall the windows to revert them and flash with your bios?

Thanks!
just flash the bios ,don't need any other.And if you used efi before,you can remove the efi and flash the bios,than it will work.
 

BradKay

Junior Member
Jun 22, 2017
6
0
66
just flash the bios ,don't need any other.And if you used efi before,you can remove the efi and flash the bios,than it will work.


5. Installing the V3.EFI driver:


(Some BIOS already incorporate the UEFI shell as part of the BIOS but if we don't have that then we can download one and put it on a FAT32 USB flash drive or other suitable boot medium and boot that.)

- Download the shell (shell.efi).

https://github.com/tianocore/edk2/tree/master/ShellBinPkg/UefiShell/X64

- Rename shell.efi to BOOTx64.EFI then create a root folder named EFI and sub folder of that named BOOT and copy the BOOTx64.EFI to there.

- Download 'V3.EFI' (V3.zip 633bytes) which can be copied to the previously formatted FAT32 USB flash drive. clear cmos and load defaults in your bios if you haven’t already.

https://www.sendspace.com/file/ck1mlr

- Copy V3.EFI to the ROOT folder of the USB.


- Get into the Bios, and Disable Secure Boot to be able to boot into the USB.
(Info for ASUS mobos (http://www.technorms.com/45538/disable-enable-secure-boot-asus-motherboard-uefi-bios-utility))


- Using the BIOS boot manager (F11 during BIOS boot on Asrock, F8 on main Menu in ASUS) we select the flash drive with 'UEFI:' prefix.

t5htat.png


- Here we press 'ESC' after shell is loaded to stop the 'startup.nsh' from running. 'startup.nsh' is similar to the old DOS '.BAT' file, just a way of automating things on shell startup.

k2n7q.png


- Our USB flash has been mounted as 'FS0:' as shown in the mapping table. Being the only USB device makes it an easy giveaway. So now we can test 'V3.EFI' which was copied earlier to the USB flash drive root by typing 'load fs0:\V3.EFI'. Hint, the TAB key can be used for auto-completion so sometimes we can save on a lot of typing. One should see 'V3 - All Turbo Set' if successful, something else if not. In this instance I've finished of with the 'exit' command which takes us back to the BIOS boot manager so we can select the 'Windows OS'. Alternatively we could have directly run Windows from the shell. For this system the Windows system partition is FS1: so being GPT typing "FS1:\EFI\Microsoft\Boot\BOOTMGFW.EFI" would do the trick.

2ia4kdi.png


- If we are happy with the driver and want to keep it we can get it to automatically load by placing it on the EFI system drive.In this instance I have copied V3.EFI from the USB flash drive 'FS0:' to the EFI system boot folder on 'FS1:' 'cp fs0:\V3.EFI fs1:\EFI\Boot'. Now using the shell boot configuration command we can add it to be executed before any OS with shell command 'bcfg driver add 0 fs1:\EFI\BOOT\V3.EFI "V3 Full Turbo"'. After that type 'reset' to restart the PC as the EFI driver has not executed as yet.


6.- Boot into Windows and do the following:

- For Windows 7 - 8.1 (including their server variants) update KB3064209 must be uninstalled, in case it is found in the system. This is a microcode update, which contains microcode version 0x2E for Haswell-Ex.
- For Windows 10 meanwhile is distributed with microcode version 0x36. To remove it, file named "mcupdate_GenuineIntel.dll" found in System32 folder must be renamed so that the system no longer finds it


7.- Install vmware driver:

- Download the VMWare tool: https://labs.vmware.com/flings/vmware-cpu-microcode-update-driver

- Download the microcodes: version 0x27 & 0x39 microcodes for Haswell-Ex (0x306F2) in VMWare driver / Linux compatible format:

-> 0x27 microcode for best performance

-> 0x39 driver for better stability


https://1drv.ms/u/s!Ag6oE4SOsCmDhFnET3uw9wHeV4EA

- Copy the file 0x27.dat (or 0x39) to the same folder as the vmware utility and rename it to microcode.dat.

- Download & copy these files to the same folder:

microcode_amd.bin
microcode_amd_fam15h.bin


- Execute install.bat as ADMIN, to execute the script.

- Reboot

- Check with HWINFO (https://www.hwinfo.com/)

- If your turbos are working as expected, post in the forum your result! =)

===========================================================================
Thank you so much for your quick answer. This is the specific guide I followed. I am worried about the step 5, 6, and 7.

Excuse my lack of knowledge and hope it does not frustrate you.

So here are my concern:

1. how do I remove efi from step5?
2. should I rename back the "mcupdate_GenuineIntel.dll" from step 6?
3.
what do I do with the VMware installed for 0x39 microcode from step7? and how do I remove it?

I really appreciate it

edit: quotes from vercety@ page9
 

CANONKONG

Member
Jul 11, 2017
98
62
46
5. Installing the V3.EFI driver:


(Some BIOS already incorporate the UEFI shell as part of the BIOS but if we don't have that then we can download one and put it on a FAT32 USB flash drive or other suitable boot medium and boot that.)

- Download the shell (shell.efi).

https://github.com/tianocore/edk2/tree/master/ShellBinPkg/UefiShell/X64

- Rename shell.efi to BOOTx64.EFI then create a root folder named EFI and sub folder of that named BOOT and copy the BOOTx64.EFI to there.

- Download 'V3.EFI' (V3.zip 633bytes) which can be copied to the previously formatted FAT32 USB flash drive. clear cmos and load defaults in your bios if you haven’t already.

https://www.sendspace.com/file/ck1mlr

- Copy V3.EFI to the ROOT folder of the USB.


- Get into the Bios, and Disable Secure Boot to be able to boot into the USB.
(Info for ASUS mobos (http://www.technorms.com/45538/disable-enable-secure-boot-asus-motherboard-uefi-bios-utility))


- Using the BIOS boot manager (F11 during BIOS boot on Asrock, F8 on main Menu in ASUS) we select the flash drive with 'UEFI:' prefix.

t5htat.png


- Here we press 'ESC' after shell is loaded to stop the 'startup.nsh' from running. 'startup.nsh' is similar to the old DOS '.BAT' file, just a way of automating things on shell startup.

k2n7q.png


- Our USB flash has been mounted as 'FS0:' as shown in the mapping table. Being the only USB device makes it an easy giveaway. So now we can test 'V3.EFI' which was copied earlier to the USB flash drive root by typing 'load fs0:\V3.EFI'. Hint, the TAB key can be used for auto-completion so sometimes we can save on a lot of typing. One should see 'V3 - All Turbo Set' if successful, something else if not. In this instance I've finished of with the 'exit' command which takes us back to the BIOS boot manager so we can select the 'Windows OS'. Alternatively we could have directly run Windows from the shell. For this system the Windows system partition is FS1: so being GPT typing "FS1:\EFI\Microsoft\Boot\BOOTMGFW.EFI" would do the trick.

2ia4kdi.png


- If we are happy with the driver and want to keep it we can get it to automatically load by placing it on the EFI system drive.In this instance I have copied V3.EFI from the USB flash drive 'FS0:' to the EFI system boot folder on 'FS1:' 'cp fs0:\V3.EFI fs1:\EFI\Boot'. Now using the shell boot configuration command we can add it to be executed before any OS with shell command 'bcfg driver add 0 fs1:\EFI\BOOT\V3.EFI "V3 Full Turbo"'. After that type 'reset' to restart the PC as the EFI driver has not executed as yet.


6.- Boot into Windows and do the following:

- For Windows 7 - 8.1 (including their server variants) update KB3064209 must be uninstalled, in case it is found in the system. This is a microcode update, which contains microcode version 0x2E for Haswell-Ex.
- For Windows 10 meanwhile is distributed with microcode version 0x36. To remove it, file named "mcupdate_GenuineIntel.dll" found in System32 folder must be renamed so that the system no longer finds it


7.- Install vmware driver:

- Download the VMWare tool: https://labs.vmware.com/flings/vmware-cpu-microcode-update-driver

- Download the microcodes: version 0x27 & 0x39 microcodes for Haswell-Ex (0x306F2) in VMWare driver / Linux compatible format:

-> 0x27 microcode for best performance

-> 0x39 driver for better stability


https://1drv.ms/u/s!Ag6oE4SOsCmDhFnET3uw9wHeV4EA

- Copy the file 0x27.dat (or 0x39) to the same folder as the vmware utility and rename it to microcode.dat.

- Download & copy these files to the same folder:

microcode_amd.bin
microcode_amd_fam15h.bin


- Execute install.bat as ADMIN, to execute the script.

- Reboot

- Check with HWINFO (https://www.hwinfo.com/)

- If your turbos are working as expected, post in the forum your result! =)

===========================================================================
Thank you so much for your quick answer. This is the specific guide I followed. I am worried about the step 5, 6, and 7.

Excuse my lack of knowledge and hope it does not frustrate you.

So here are my concern:

1. how do I remove efi from step5?
2. should I rename back the "mcupdate_GenuineIntel.dll" from step 6?
3.
what do I do with the VMware installed for 0x39 microcode from step7? and how do I remove it?

I really appreciate it

edit: quotes from vercety@ page9
1、You can use a WINPE and found the v3.efi in the uefi disk,and delete it.Or
you can use shall to remove it.
2、yes,rename it back
3、don't need to remove it.
 
  • Like
Reactions: BradKay

chris_osw

Junior Member
Apr 5, 2017
11
2
51
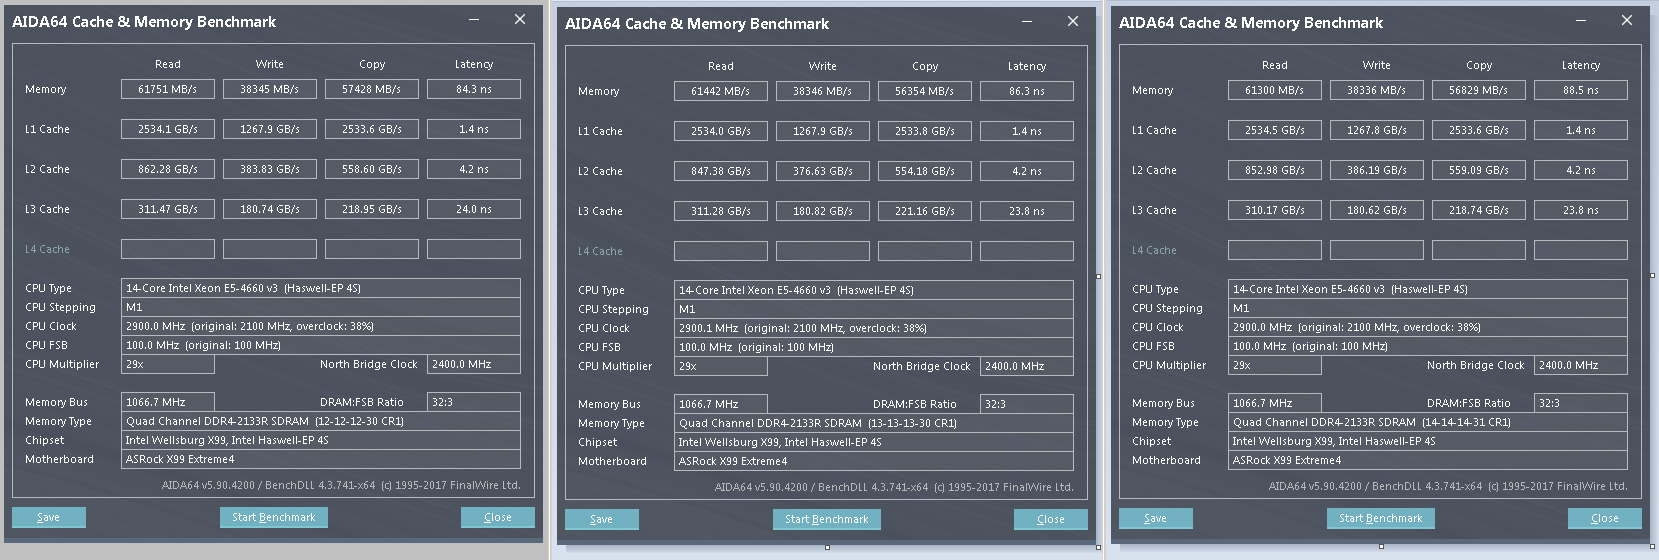
How to set default Northbridge clock 2400Mhz to cpu clock 2900Mhz ,after mod
Motherboard Asrock X99 Extreme4 ,modded bios 3.60 ???

Memory perfomance is poor ,i try set lower ddr4 timings def: 15-15-15-36 (1,20V) to 12-12-12-30 1,260V
Memory 8 x 4GB ddr4 2133Mhz Hynix ECC-R.


zaciesnianietimingow89rxvz.png
 

Cata40

Member
Mar 2, 2017
156
6
81
How to set default Northbridge clock 2400Mhz to cpu clock 2900Mhz ,after mod
Motherboard Asrock X99 Extreme4 ,modded bios 3.60 ???

Memory perfomance is poor ,i try set lower ddr4 timings def: 15-15-15-36 (1,20V) to 12-12-12-30 1,260V
Memory 8 x 4GB ddr4 2133Mhz Hynix ECC-R.


zaciesnianietimingow89rxvz.png
After i see, i try myself to do exactly same think
i have same memory and works
 

knopflerbruce

Junior Member
Mar 5, 2017
15
1
41
I changed my Crucial 4x4GB kit to a HyperX 4x8GB one, and now I can run 1T as per CPUz. Strange... not sure if it's because of the BIOS or not.
 

SZAO6

Junior Member
Feb 19, 2017
13
1
51
The mod bios both with -70mv Vcore offset,so I don't recommend to change BLCK,because the voltage cannot hold a high BCLK.And too much BLCK is bad for nvme SSD,it will make mvme SSD loss speed and damage.
Yes, but the Sketchup vray crasehs even when the BCLK is on the standard clock, 100MHz. I have said that I can't give more than a 100MHz even before load to Windows. Maybe 70mv is to high undervolt, and 50mv will be better?
Have anyone problems with the CANONKONG bios mods for Asrock?
I have to revert back to the old bios, because I must to do something with vray, and for now I'm not able to do this.
 

CANONKONG

Member
Jul 11, 2017
98
62
46
Yes, but the Sketchup vray crasehs even when the BCLK is on the standard clock, 100MHz. I have said that I can't give more than a 100MHz even before load to Windows. Maybe 70mv is to high undervolt, and 50mv will be better?
Have anyone problems with the CANONKONG bios mods for Asrock?
I have to revert back to the old bios, because I must to do something with vray, and for now I'm not able to do this.
Your CPU can't stable to use -70mv
,you can use a bios with -50mv or higher voltage. I had written a tutorial about modifying BIOS,you can try to make a mod bios.