Delidded my i7-3770K, loaded temperatures drop by 20°C at 4.7GHz

Idontcare

Elite Member
Oct 10, 1999
21,118
58
91
Edit: Adding direct links to specific posts within this thread that contain specific updates, a table of contents if you will:
Original Opening Post:
OK, not a big surprise, lots of people have been delidding their 3570k's and 3770k's to replace the thermal interface material (TIM) that Intel puts between the CPU chip and the underside of the integrated heat spreader (IHS)...but after observing no improvement in my 3770k's loaded temperatures after lapping the IHS, I wasn't holding out much hope that my chip would be anything special even with a delidding.

Nevertheless I delidded it anyway, did a bunch of tests but eventually replaced the stock CPU TIM with some noctua NT-H1 thermal paste, put the IHS lid back on and mounted my H100 with some NT-H1 as if the 3770k had never been delidded to begin with.

DeliddedwithNT-H1.jpg


^ I intentionally used a LOT of NT-H1 on the CPU because there was a large amount of room under the IHS for the excess to go and because I really wanted to avoid risking chipping the corners of my CPU at this early stage of testing after delidding. I'll dial that volume of TIM back down to reasonable levels in later tests.
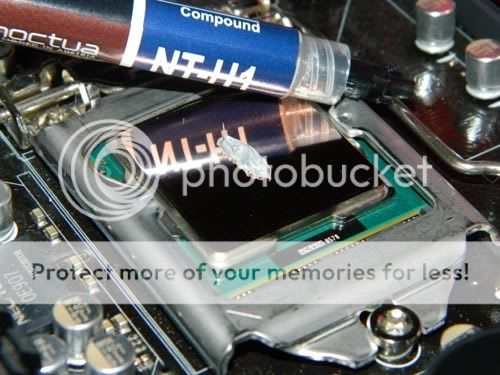
ReseatedIHSonDeliddedwithNT-H1.jpg


^ reseated the IHS over the CPU, you really have to "back it up" by initially placing the IHS well off-center so that by the time the socket retention mechanism was done latching onto the wings of the IHS the IHS itself had been pushed into a center position by the latch.

I have lots of pics to share regarding the process involved in obtaining the following results, but first lets just cut right to the it and get the exciting result up front and center! :)
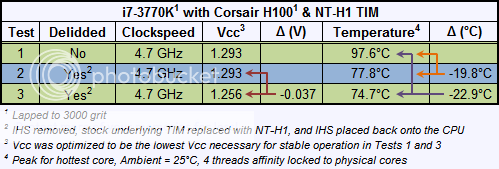
Delidded3770k47GHzresults.png


At 4.7GHz, the highest I could overclock my lapped 3770k with a lapped H100 using NT-H1 paste before I delidded, the peak operating temps under LinX are reduced by a rather astonishing 20°C! :eek: :eek:

Further still, because the operating temperatures had decreased so much, I was able to reduce the required Vcc for maintaining stability by ~0.04V which in turn reduced the operating temperatures by another 3°C :thumbsup:

The reduction in operating temperatures and required voltage came with the added benefit of reducing power consumption of the the CPU by ~10% (more on this later) at 4.7GHz.

Turning this around and asking the question "what can we do with this new found thermal headroom?" I was able to get another 0.2GHz out of the chip while staying within a comfortable operating voltage range.
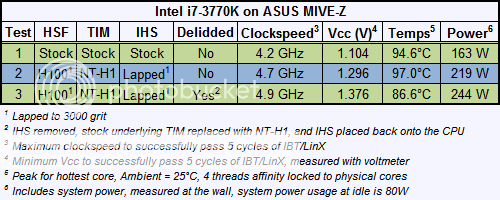
3770kMaxOCresults.png


From an "extra OC'ing headroom" standpoint, popping off the IHS and replacing the Intel stock TIM under the IHS with some NT-H1 and then putting the IHS back onto the CPU results in gaining access to an extra 200 MHz clockspeed without running into the TJmax brick wall, provided you are willing to stomach the elevated power consumption and required voltage to hit 4.9GHz.

(note 5Ghz, LinX stable, is doable but requires an unsettling 1.450V which I would not personally want to use on a 24/7 basis for concerns of voltage-induced degradation)

So the temperature drop is real, the improvement in OC'ing is real, the question would be a matter of "is it worth it"? But that is a universally applicable question to all things OC'ing or enthusiast-like with this hobby.

For all my efforts so far in this project I felt the resultant decrease in operating temperatures was nice but I also felt the improvement in OC'ing headroom was a bit lacking considering I could hit 5GHz on my lapped 2600k with the same mobo and same H100.

But it has been fun, I am actually thankful to Intel that they elected to not solder my 3770k as it gave me a chance to play around "under the hood" as it were. Something I can't do with my 2600k. (speaking of playing around under the hood, more results of that playing around will be forthcoming and posted up in this thread)
 
Last edited:

Idontcare

Elite Member
Oct 10, 1999
21,118
58
91
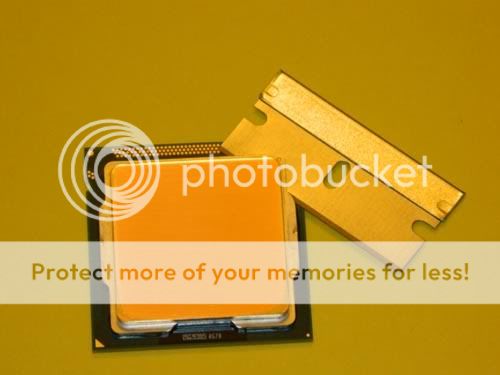
Delidding was rather straightforward but involved more work than was involved in delidding my GTX460 because unlike the rock-hard adhesive Nvidia used on the GTX460, Intel opted to use a much more rubbery-like adhesive glue which had to be cut clean-thru rather than cleaved/cracked open with a little prying.

With my GTX460 I merely had to insert a razor blade under the four corners of the lid, and then after applying a bit of torque on the blade itself the lid just popped off of the PCB.

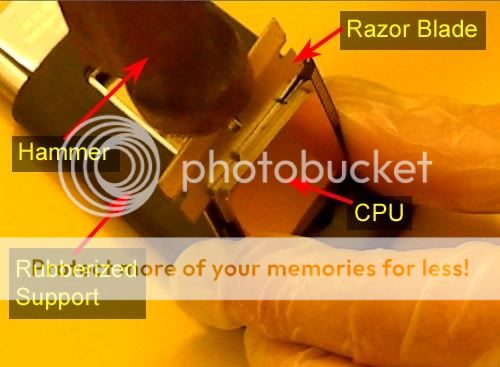
However the IHS on the 3770k was not going to go so easily. You can read a kinder and gentler version of how to get the lid off in fellow colleague graysky's 3770k delidding thread. My approach, however, was a little more energetic and involved a hammer :eek:...but it was just a small hammer :sneaky:

Hammertime.jpg


D:

No, seriously, the hammer was quite useful for me because I had much more control over the amount of force with which I was inserting the razor blade through the lid's adhesive versus just trying to do it by brute arm strength (I could tell I was going to push too hard and cut through to fast once the adhesive "went").

InertingrazorbladeunderIHScorner.jpg


Bring out yer hammers! :twisted:

Hammertimeforrealz.jpg


^ that might look like a bad idea but really it is just a tack hammer and I was doing very very light taps with it, far gentler and more controlled than I was able to press on the razor blade with my hands. Maybe I'm just clumsy with my hands, in any event the hammer did the job and got the blade through all that adhesive all the way around the IHS without destroying the CPU.

RazorbladeunderIHScorner.jpg


Deliddedpre-cleanup.jpg


Ta da! :D

I was quite surprised by how tiny the actual die is for being under such a huge heat spreader.


I captured a few videos of the delidding process and uploaded them to youtube:
There are definitely more elegant ways to do this (see graysky's thread), but I figured this would at least serve as an example of just how rough and abusive you can be when delidding the 3770k and still manage to avoid killing it.
 

Idontcare

Elite Member
Oct 10, 1999
21,118
58
91
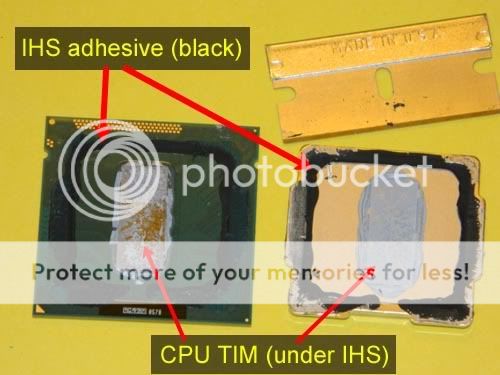
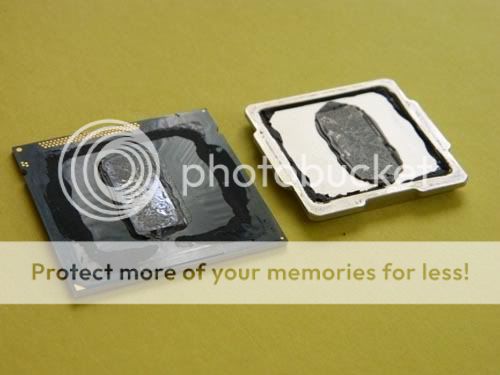
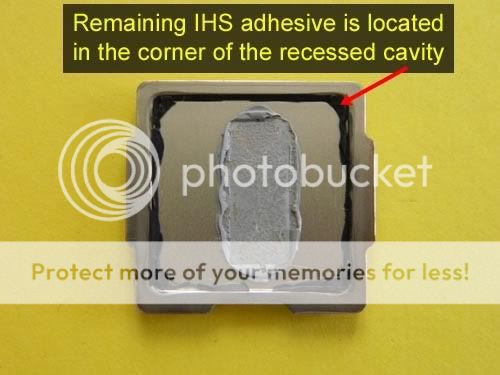
As soon as I popped off the lid I could tell the IHS adhesive (the black rubbery stuff in the pics below) was going to have to go.

I had no confidence in my being able to properly/fully reseat the IHS down over the CPU correctly and flatly without excessive tilting to one side or the other that would create a sloping gap between the CPU and the underside of the IHS if there were any remnants of the adhesive on either the PCB or the contacting lip of the underside of the IHS.

Immediately after delidding:

Deliddedpre-cleanup.jpg


Did my best to scrape off as much of of the IHS adhesive (the black stuff, not to be confused with the CPU TIM which is gray and located in the middle region of the CPU) using a razor blade and some IPA and lots of scrubbing with qtips and elbow grease:

PCBIHSafterbladecleanup.jpg


^ that just wasn't going to do, my paranoia may be overblown and irrelevant but I wanted a nice clean PCB surface to remount the IHS onto.

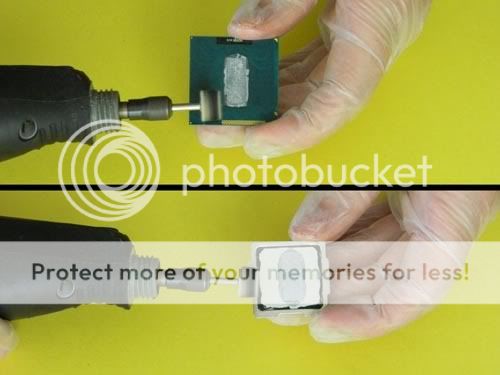
I already spilled these beans in the other thread that was about lapping, wasn't supposed to become a thread about the delidding itself per se, but it was dremel time! :twisted:

DremelcleanupofPCBIHS.jpg


I found that saturating the white felt buffer wheel in IPA was key to removing the adhesive. If I didn't use the IPA with the dremel then the adhesive just heated up and got gooey as it balled up but never really came off the surface in a satisfactory way.

It was easy to dip the buffer wheel into a capful of IPA from the bottle (91% IPA), and to prevent slinging IPA all over myself and the room when ramping up the rpms on the dremel I just put the dremel tip inside a coffee mug and gave it a quick spin-up to sling off the excess which was then captured by the sidewalls of the coffee mug.

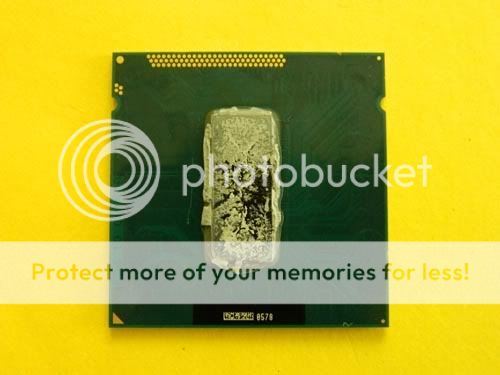
This process took about 15 minutes all told, to cleanup both the PCB and the IHS. But it definitely got the job done, I intentionally left the original CPU TIM in place for now as I wanted to see how it would do if I immediately remounted the IHS and tested it as is:

i7-3770Kdeliddedpostinitialcleanup.jpg


IHSdeliddedpostinitialcleanup.jpg


The dremel left absolutely no marking or scruffing on the PCB (the one scratch you see on the PCB was my fault from the razor blade when I was initially attempting to scrape the adhesive off).

Obviously rpm and applied pressure make a difference here but to whatever extent that I applied pressure and rpms (I only went up to 3 or 4 out of 10 on the rpm dial) it had absolutely no ill-effects on the PCB.

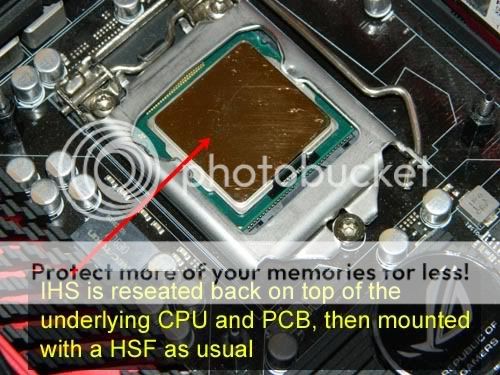
As mentioned above, I initially left the original CPU TIM in place and remounted the IHS, taking care to ensure it fit together like a puzzle piece so the two surfaces mated together as best as possible.

IHSreseatedoverthePCBandCPU.jpg


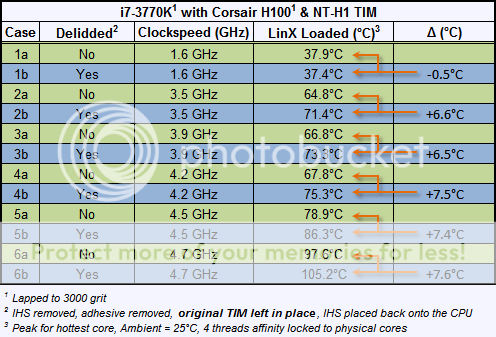
Using NT-H1 with my H100, the results were not good, in fact they were downright discouraging :(

DeliddedresultswithoriginalCPUTIM.png


Boasting a 7-8°C increase in operating temperatures, obviously my attempt to reseat the IHS over the CPU with the original CPU TIM still in place was something decidedly short of being a resounding success :D

So I pulled off the H100 and unmounted the IHS to move on with the next test - using the Intel CPU TIM from under the IHS as a TIM on top of the IHS of my 2600k for a comparison with other TIMs. (i.e. the "is that CPU TIM crappy stuff, or good stuff?" test)

Oh, before I forget to mention it, if you want to see that PCB getting some dremel loven then hit this link for a youtube video I uploaded that captured it all in full HD glory, LOL. The original was some 15+ minutes long but I reduced that to ~3min by cropping out segments in the original clip before uploading to youtube, so if you notice that it seems to jump around at times then you are noticing the intentional skips I added.
 

ShintaiDK

Lifer
Apr 22, 2012
20,378
145
106
When in doubt, use hammer! :D

I guess you also moved the IHS closer to the die if you cleaned off all the adhesive.

Amazing results with lapped, adhesive removed and TIM replaced :thumbsup:
 

pantsaregood

Senior member
Feb 13, 2011
993
37
91
Is there a reason you haven't tried direct die contact? I guess it isn't irrational to worry about cracking the die, but we've all mounted a Coppermine or K7 back in the day. I don't see why it would be any more dangerous now.
 

Ferzerp

Diamond Member
Oct 12, 1999
6,438
107
106
Glad you took the time to rigorously test. I had estimated 10-15C (leaning more towards 15C) on mine. It's nice to have real numbers. And they seem pretty much in line with what we would expect after the initial, less rigorous reports (even better actually).

I'll be curious to see if you end up with the core 3 temp problem that I get every month or two (where core 3 seems to spike in temp compared to the other cores, and I have to tear it down and re-apply everything)
 
Last edited:

graysky

Senior member
Mar 8, 2007
796
1
81
I also tried a carbon based pastes, mx4 and NT-H1. Both of these gave inferior results compared to AS5. You have any to try?
 

BonzaiDuck

Lifer
Jun 30, 2004
15,709
1,450
126
Sticky. But you must finish this.

I'm surprised you got so much done while getting so much documented, videoed and photographed.

Do you have any indication that perhaps the Intel TIM is really AS5?
 
Last edited:

Termie

Diamond Member
Aug 17, 2005
7,949
48
91
www.techbuyersguru.com
This is quite amazing. Thanks for all the hard work!

What I don't understand is how that razor blade didn't hit the die, which I assume is not flush with the PCB, when cutting the stock TIM.

BTW, do you have a third hand? No other explanation for how you got those pics!
 

BonzaiDuck

Lifer
Jun 30, 2004
15,709
1,450
126
For all my efforts so far in this project I felt the resultant decrease in operating temperatures was nice but I also felt the improvement in OC'ing headroom was a bit lacking considering I could hit 5GHz on my lapped 2600k with the same mobo and same H100.

What was the stable load voltage (anything that survived a prelim IBT or LinX test) @ 4.9 with the i7-2600K? Wasn't the successive voltage increase for i7-2600K between 4.7 and 4.9 Ghz rising steeply?
 

Plimogz

Senior member
Oct 3, 2009
678
0
71
[...]

So I pulled off the H100 and unmounted the IHS to move on with the next test - using the Intel CPU TIM from under the IHS as a TIM on top of the IHS of my 2600k for a comparison with other TIMs. (i.e. the "is that CPU TIM crappy stuff, or good stuff?" test)

[...]

Now that's a fantastic idea! Can't wait.
 
Dec 30, 2004
12,554
2
76
The benefits from lapping are from the leveling effect, not the polishing or removal of micro-ridges and scratches.

Getting rid of the big bowl that pools TIM in the middle is the benefit, going beyond that is neither hurting nor helping at a practical level. You could probably stop with 220 or 400 grit and realize 99% of the benefit of lapping to 3000 grit.

I go to 3000grit because it is easy to do (takes all of 15 minutes once you have the supplies assembled) and I personally like the aesthetics of a mirror-polished surface.

At the academic level, the maximum thermal conductivity to be had will come only when phonon-phonon coupling is optimally maximized and phonon-scattering is minimized across each interface in the stack.

Ridges constrict the accessible manifold of phonon wavelengths owing to the geometric boundary conditions each ridge creates...the ideal boundary condition for maximum phonon accessibility only comes when the entire surface is atomically flat (no ridges) and with zero point defects (thermodynamically this is only possible at absolute zero for ordered crystals).
to play devils advocate, having /\/\/\/\/\/\/\/\ as in with an unlapped surface vs __________ with lapped would increase the surface area, allowing for greater thermal dissipation....if you could get the thermal compound into those grooves...no?
 
Dec 30, 2004
12,554
2
76
Hammertime.jpg


D:

No, seriously, the hammer was quite useful for me because I had much more control over the amount of force with which I was inserting the razor blade through the lid's adhesive versus just trying to do it by brute arm strength (I could tell I was going to push too hard and cut through to fast once the adhesive "went").

InertingrazorbladeunderIHScorner.jpg


Bring out yer hammers! :twisted:

Hammertimeforrealz.jpg


^ that might look like a bad idea but really it is just a tack hammer and I was doing very very light taps with it, far gentler and more controlled than I was able to press on the razor blade with my hands. Maybe I'm just clumsy with my hands, in any event the hammer did the job and got the blade through all that adhesive all the way around the IHS without destroying the CPU.

RazorbladeunderIHScorner.jpg
from these photos we can clearly make out that IDC runs his own fab facility in his basement. He is currently manufacturing 14nm chips and is developing a 10nm in his spare time for his own personal use using EUV lithography (also developed in his spare time)

Fab_Worker.jpg

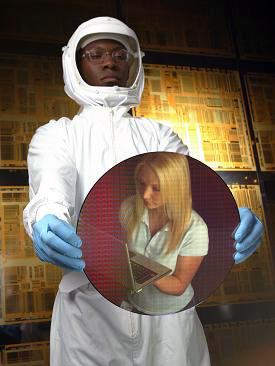
in this photo we can see him working on a prototype OLED Ipad4 display. We see he is of asian descent, clearly only the finest genetic material is part of IDC's genome.


300mm_wafer.jpg

in this photo we can see he is also of african descent and was working at Intel at the young age of 17-- again, he incorporates only the finest, most intelligent genetic material of all of us.

In addition we see him demoing one of his 450mm wafers using his 10nm EUV prototype lithography stepping
We also see in this photo that he has a smoking hot wife who attends to his every PC need carrying a laptop for his use wherever he goes.


AMDFabWorkers.png

and finally here we see him and his clones at work in his fab.

A clearly superior, genetically perfect human that only the best of us can merely aspire to imitate. To be him, however, is without a question, impossibly beyond our limited genetic pool. ;-D
 
Last edited:

BonzaiDuck

Lifer
Jun 30, 2004
15,709
1,450
126
The i7-2600K apparently overclocks to 4.9Ghz with approximate load voltage in the 1.44 to 1.46V range. In any event, it is above 1.41V.

So if IDC OC'd an i7-3770K chip at 4.9 with about 1.37+V, it doesn't seem like much of an advantage. . . .
 

Yuriman

Diamond Member
Jun 25, 2004
5,530
141
106
When you put the IHS back on your chip, was there any gap at all between the lid and the PCB? I'm concerned that the IHS might rock and crush a corner or edge because there isn't black goop filling that space and preventing it from rocking.
 

HondaCop

Member
Aug 4, 2012
42
0
0
Awesome thread, IDC! I delidded my 3770K a few days ago and I also have a H100 hooked up to it. I used AS5 but I wasn't too pleased with the results so far. At 4.9Ghz and vcore 1.46v, my full load temps are in the middle to upper 90s, with core 3 usually breaking the 100C mark.

I have Liquid Metal Ultra on the way and it should arrive next week.

I lapped my H100 but it is no where near to the shineness of yours. I think I will lap it a bit further and Im also debating on whether I should lap the IHS as well.

I really like your methology of booting to a set Ghz and then slowing reducing vcore on the fly until the CPU falters in LinX.

I think I will start all over again and use that process for my OC job.

Any tips or tutorial on how to lap the right way?

- Grammar *censored*, this was sent from my phone.
 

geniusloci

Member
Mar 6, 2012
84
0
0
What this would prove I imagine is that Intel is cheating it's customer base by getting rid of TIM to save a buck.
 

oceanside

Member
Oct 10, 2011
50
0
0
Awesome thread, IDC! I delidded my 3770K a few days ago and I also have a H100 hooked up to it. I used AS5 but I wasn't too pleased with the results so far. At 4.9Ghz and vcore 1.46v, my full load temps are in the middle to upper 90s, with core 3 usually breaking the 100C mark.

I have Liquid Metal Ultra on the way and it should arrive next week.

I lapped my H100 but it is no where near to the shineness of yours. I think I will lap it a bit further and Im also debating on whether I should lap the IHS as well.

I really like your methology of booting to a set Ghz and then slowing reducing vcore on the fly until the CPU falters in LinX.

I think I will start all over again and use that process for my OC job.

Any tips or tutorial on how to lap the right way?

- Grammar *censored*, this was sent from my phone.

Here's one that IDC did on lapping his H100. link
 

dma0991

Platinum Member
Mar 17, 2011
2,723
1
0
Reading threads about delidding and great temps is tempting me to delid my Core i5 3570K. :\