Aikouka
Lifer
The Background
This past weekend, I went on a crusade to finally get one of my bedrooms better suited to handle being more of a computer room, which would house two higher-end gaming machines. As one would expect, heat would be an issue in such a room, and as a result, I went to make two changes: installed a window air conditioner and replace the ceiling light fixture with a ceiling fan. The air conditioner install was fairly straight forward as I went with the Midea U-shaped window air conditioner, which has an included bracket that works well with my retrofitted vinyl windows. It's not perfect as I think Midea could make some good changes to really tighten things up, but it's working fine. Unsurprisingly based upon the title, where I hit quite a major snag was the installation of the ceiling fan.
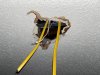
When I removed the light fixture, I noticed yellowing of the drywall around the box's hole. I touched the drywall lightly, and it seemed pretty apparent that the drywall was not in good shape as it seemed that any harder likely would've broken the drywall off. Unfortunately, in the process of removing the nailed-in junction box, some of the drywall did break off. Given how much drywall broke off and how much weak drywall was still left, I decided to perform a patch.
I had a rough understanding of how to perform this, and overall, I think I did an okay job. Some areas on which I probably could've done better...
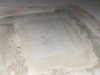
So, what brought on this thread is that I noticed that after 24+ hours, the portion of the setting compound from the tape outward is still fairly beige in color, which from what I read, indicates that it is not yet completely dry. I know that the time on the package is simply for it to harden/set and not the time for it to dry, but I've read that drying times are usually from 2-3 hours up to maybe 24 hours. The room is usually around 70-75F and 40% to 50% humidity, so I don't think it would be an issue with high humidity. That's why I wasn't sure if the issue had to do with wetter setting compound, but then again, even in the area right beyond the tape where some of the compound was feathered into, it's also beige there. Although, thinking about it more now, it's also true that the white area is on the new drywall and the beige area is on the old drywall. I had to strip off the original (painted) popcorn texture (using paint stripper), and I'm not sure if I should have performed other prep work (e.g. sanding to help remove old mud dust) prior to using the setting compound.
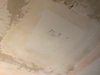
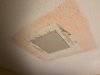
I've attached photos of the original hole, the patched section, and the mudded patch. (The latter is kind of poor quality, so I'll have to grab another photo later.)
This past weekend, I went on a crusade to finally get one of my bedrooms better suited to handle being more of a computer room, which would house two higher-end gaming machines. As one would expect, heat would be an issue in such a room, and as a result, I went to make two changes: installed a window air conditioner and replace the ceiling light fixture with a ceiling fan. The air conditioner install was fairly straight forward as I went with the Midea U-shaped window air conditioner, which has an included bracket that works well with my retrofitted vinyl windows. It's not perfect as I think Midea could make some good changes to really tighten things up, but it's working fine. Unsurprisingly based upon the title, where I hit quite a major snag was the installation of the ceiling fan.
When I removed the light fixture, I noticed yellowing of the drywall around the box's hole. I touched the drywall lightly, and it seemed pretty apparent that the drywall was not in good shape as it seemed that any harder likely would've broken the drywall off. Unfortunately, in the process of removing the nailed-in junction box, some of the drywall did break off. Given how much drywall broke off and how much weak drywall was still left, I decided to perform a patch.
I had a rough understanding of how to perform this, and overall, I think I did an okay job. Some areas on which I probably could've done better...
- I cut the drywall out first and attempted to use that to cut out the patch. Given that I was working with ruined drywall, that just wasn't a smart move. I was able to make it work, but it definitely took more effort than was required. It also doesn't help you make a nice rectangular hole since it's much easier to score the patch piece at proper angles than it is to try to get it right on the ceiling/wall. I actually ended up cutting a proper rectangular patch and having to go back to adjust the hole to make it fit properly.
- I probably used more furring strips than were required. Overall, the patch was around 16" x 16", which isn't terribly large. I also had a joist within 3-4" of one side; however, I still used a furring strip on that side, and on the other side as well as furring strips on the other edges. At least in my understanding, this doesn't hurt, but it's likely not necessary.
- I needed to get a bit better at screwing the drywall screws in as straight as possible, and also check them then rather than later on. They looked after I was done, but when I went to check with a taping knife later on, a few of them needed to be fixed.
- I debated on what sort of tape to use for this, and settled on using FibaFuse, which is a fiberglass-based tape. It has the permeability of mesh tape while (supposedly) providing the strength of paper tape. (Although, I did see some paper tape with holes too.) I was considering mesh tape for a while too, but I could never find definitive answers on whether it was fine to apply the tape, and then use setting compound. I know you need to use it with mesh tape, but I wasn't sure if the mesh was permeable enough to really fill the gaps? (My gaps weren't terribly large.)
- I think my setting compound might have been a little too watery. I did try to only add a bit of water at a time and then mixing until the water was almost gone before adding more. (I had heard about using this technique in a video.) Although, I think I might not have done the one thing that I read about and that was that once you mix it up, let it sit for a minute or two so the chunks can absorb the water.
So, what brought on this thread is that I noticed that after 24+ hours, the portion of the setting compound from the tape outward is still fairly beige in color, which from what I read, indicates that it is not yet completely dry. I know that the time on the package is simply for it to harden/set and not the time for it to dry, but I've read that drying times are usually from 2-3 hours up to maybe 24 hours. The room is usually around 70-75F and 40% to 50% humidity, so I don't think it would be an issue with high humidity. That's why I wasn't sure if the issue had to do with wetter setting compound, but then again, even in the area right beyond the tape where some of the compound was feathered into, it's also beige there. Although, thinking about it more now, it's also true that the white area is on the new drywall and the beige area is on the old drywall. I had to strip off the original (painted) popcorn texture (using paint stripper), and I'm not sure if I should have performed other prep work (e.g. sanding to help remove old mud dust) prior to using the setting compound.
I've attached photos of the original hole, the patched section, and the mudded patch. (The latter is kind of poor quality, so I'll have to grab another photo later.)