Need help on how to repair flagstone step (pictures included)

evident

Lifer
Apr 5, 2005
12,092
703
126
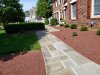
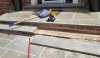
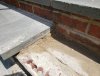
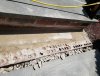
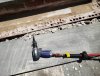
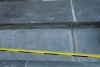
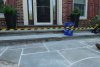
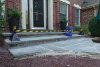
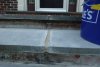
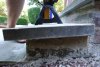
I am a complete newbie when it comes to cement/mortar work. I have a flagstone walkway and stone steps laid on top of brick that go up to my front door. the two stone steps have gotten very loose and one has completely broke loose. I removed it and placed it on the floor so that it doesn't fall and crack. I've seen several youtube videos on how this repair can be done. I've seen people suggesting that landscaping adhesive would be enough, but I suspect that is not the "correct" way to do it. I've also seen the quickrete quick repair kit used. But I think the correct way is to lay down mortar, level it out and then place the stones on top of them. The stone on the left is also loose so I will probably remove that as well and re-do both at the same time to make leveling a little bit easier. I am also overwhelmed and confused about what product to buy. I currently purchased two 60 lb bags of quickrete mortar. But the guy at lowes told me to use portland cement, others say to use the quick repair, etc. What is correct to use in my case?

Can i just clean up whatever loose cement/mortar that's there, lay mortar on top of the existing surfaceand place the stone back on top? Or do I have to chisel away everything? I would like to do this job correctly so I can learn a thing or two as well.

20190716_160406.jpg


20190716_160411.jpg

20190716_160418.jpg
 

Attachments

  • 20190716_160333.jpg
    20190716_160333.jpg
    318 KB · Views: 19

mxnerd

Diamond Member
Jul 6, 2007
6,799
1,103
126
It looks terrible and won't hold very long.

I would remove everything and use concrete mix to rebuild that layer.

Let it cure then apply construction adhesive on top then put the step stone back.

*Just a house owner*
 

evident

Lifer
Apr 5, 2005
12,092
703
126
It looks terrible and won't hold very long.

I would remove everything and use concrete mix to rebuild that layer.

Let it cure then apply construction adhesive on top then put the step stone back.

*Just a house owner*


What looks terrible? The stuff underneath where the step stone lays on? So I should jackhammer/chisel out that stuff and use "concrete mix" to build the base layer, right? And then i should use the construction adhesive on top of that (and by construction adhesive you mean something like loctite pl500)??
 

mxnerd

Diamond Member
Jul 6, 2007
6,799
1,103
126
What looks terrible? The stuff underneath where the step stone lays on? So I should jackhammer/chisel out that stuff and use "concrete mix" to build the base layer, right? And then i should use the construction adhesive on top of that (and by construction adhesive you mean something like loctite pl500)??

Yep. That's just my opinion. But I'm not a professional.

Someone might have better idea.

I used Loctite 3X to glue garden gate brick post back to the concrete at the bottom and it holds extremely strong.
 
Last edited:

Greenman

Lifer
Oct 15, 1999
21,693
6,133
136
The mortar mix you have should be fine. Don't use Portland cement, that's one component of mortar, you need sand as well.
You should chip of as much of the old mortar off as possible. When you reset the stone, leave the mortar a bit high and tap the stone down into the mortar until it's even with the surrounding surface. Before placing the mortar be sure the surface it's going on is damp, not wet, just damp. Don't walk on it for a couple of days.
 
  • Like
Reactions: mxnerd

evident

Lifer
Apr 5, 2005
12,092
703
126
I removed most of the existing mortar to the point that its level with the brick wall. Luckily I have a chisel air tool from another project, but it's still not easy. Is this enough? of course we had to enter into a heatwave starting today. It is hot AF. I really need to remove the stone on the left as well and get to that, it is very loose.
 

Attachments

  • 20190717_140210.jpg
    20190717_140210.jpg
    540.5 KB · Views: 29
  • 20190717_140215.jpg
    20190717_140215.jpg
    664.8 KB · Views: 29
  • 20190717_140218.jpg
    20190717_140218.jpg
    669.1 KB · Views: 29
  • 20190717_140230.jpg
    20190717_140230.jpg
    697.8 KB · Views: 28

BoomerD

No Lifer
Feb 26, 2006
65,602
13,980
146
The mortar mix you have should be fine. Don't use Portland cement, that's one component of mortar, you need sand as well.
You should chip of as much of the old mortar off as possible. When you reset the stone, leave the mortar a bit high and tap the stone down into the mortar until it's even with the surrounding surface. Before placing the mortar be sure the surface it's going on is damp, not wet, just damp. Don't walk on it for a couple of days.

Doesn't mortar also have lime in it? It's been over 30 years since I had to mix that shit.

Edit...looks like it's optional...but beneficial?
https://www.graymont.com/en/markets/building-construction/mortar/benefits-cement-lime-mortar

and Masonry cement contains lime:
https://www.sakrete.com/blog/what-is-mortar

I removed most of the existing mortar to the point that its level with the brick wall. Luckily I have a chisel air tool from another project, but it's still not easy. Is this enough? of course we had to enter into a heatwave starting today. It is hot AF. I really need to remove the stone on the left as well and get to that, it is very loose.
The more of the old stuff you can remove, the better. get a nice clean surface for the mortar to bond to...and, yes, remove the other stone as well...get them both nice and level, not only to the step, but in relation to each other.
 

highland145

Lifer
Oct 12, 2009
43,973
6,334
136
Those are some might clean planter beds.
jelly
Sorry, that's all I got but what they said.
 

mxnerd

Diamond Member
Jul 6, 2007
6,799
1,103
126
I think what's important is that you can't add too much water. it looks like that's what caused the original mortar to break down. Stick to what's suggested on the bag.
 

evident

Lifer
Apr 5, 2005
12,092
703
126
both steps removed and cleaned . i think i had a heat stroke lol. From what i read on other forums I should get type S mortar. and also build templates out of wood or mortar to pitch and make the height correct so that when i press the stone down it doesn't get too depressed.

I think what's important is that you can't add too much water. it looks like that's what caused the original mortar to break down. Stick to what's suggested on the bag.

I would have imagined that the previous owners had this professionally done so im surprised that the contractors wouldn't have mixed it properly. I mean it did last at least 10 years... PA is pretty harsh where we get tons of rain and we have several freeze and thaw cycles.
 
  • Like
Reactions: mxnerd

jmagg

Platinum Member
Nov 21, 2001
2,168
441
136
What greenman said, and add the dampening of the under side of the stone with a tight smear before setting. Also be diligent in tuck pointing the joints as this is where you may have had water infiltration and freezing under the stone, which would eventually break the bond,, or dead or dying mortar was used when set. Get the correct size pointing trowel, dampen and smear the joint surfaces before packing tight for the optimal bond, 1/4 inch pitch back to front. Do it out of the sun and don't make a mess.
 
Last edited:
  • Like
Reactions: evident

evident

Lifer
Apr 5, 2005
12,092
703
126
What greenman said, and add the dampening of the under side of the stone with a tight smear before setting. Also be diligent in tuck pointing the joints as this is where you may have had water infiltration and freezing under the stone, which would eventually break the bond,, or dead or dying mortar was used when set. Get the correct size pointing trowel, dampen and smear the joint surfaces before packing tight for the optimal bond, 1/4 inch pitch back to front. Do it out of the sun and don't make a mess.
Thanks.. I am hoping it will get cooler sometime this week so i can finish this job...
 

Greenman

Lifer
Oct 15, 1999
21,693
6,133
136
I removed most of the existing mortar to the point that its level with the brick wall. Luckily I have a chisel air tool from another project, but it's still not easy. Is this enough? of course we had to enter into a heatwave starting today. It is hot AF. I really need to remove the stone on the left as well and get to that, it is very loose.
Just noticed the pictures. That's some darn fine prep work you've done! I am going to have to deduct 2 points for the use of a plastic snow shovel, you were looking pro grade until that showed up. Lets not have this sort of mistake again.;)
 

evident

Lifer
Apr 5, 2005
12,092
703
126
Just noticed the pictures. That's some darn fine prep work you've done! I am going to have to deduct 2 points for the use of a plastic snow shovel, you were looking pro grade until that showed up. Lets not have this sort of mistake again.;)
Thanks. If it wasn't for my 30 gallon air compressor and air hammer attachment I probably would have paid someone to do this. Also not pro grade because my grout colors are mismatched, but lowes didnt have anything to make the grout white. Was suggested that I can get paint to paint the grout lines. I dont know if that's ever gonna happen:)

Here's the finished result. I hope I was able to get the bed of mortar level enough so that the entire stone surface was touching it. I made sure that the stones sloped to either sides and down.

Hardest part was figuring if i was mixing correctly. I followed the instructions on the back and it had this wet sand like consistency. I tried to be as clean as possible but looks like i'll need to get some acid to do some cleaning later. My brick faces are a mess, and the other stones around them are messy too.
 

Attachments

  • DSC09603.JPG
    DSC09603.JPG
    803.5 KB · Views: 17
  • DSC09604.JPG
    DSC09604.JPG
    654.1 KB · Views: 19
  • DSC09605.JPG
    DSC09605.JPG
    825 KB · Views: 20
  • DSC09606.JPG
    DSC09606.JPG
    864.1 KB · Views: 20
  • DSC09607.JPG
    DSC09607.JPG
    648.9 KB · Views: 18
  • DSC09608.JPG
    DSC09608.JPG
    307.6 KB · Views: 21
Last edited:

jmagg

Platinum Member
Nov 21, 2001
2,168
441
136
Looks pretty good. Common mistake to mix the mud too wet, and back to front looks a tad steep but it sure isn't going anywhere soon.