Ice maker outlet box

Sukhoi

Elite Member
Dec 5, 1999
15,312
88
91
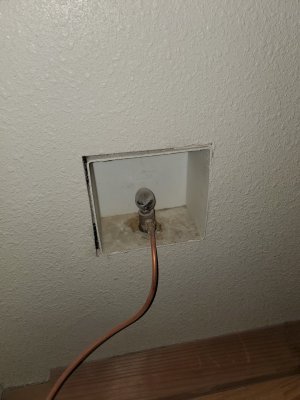
A couple years ago when I took the attached pic I stupidly tried closing the valve as we don't use the ice maker, and found that the stem leaks when the valve is closed. After a bit of panic I luckily found it stopped leaking when reopened. This is at a remote condo that's an hour from a hardware store so you gotta be prepared with all your tools & supplies, and getting a plumber costs a billion dollars.

The attached fridge is from 1999 just like the valve, so this is going to be a problem soon enough when the fridge finally dies. Some questions to try to be better prepared:
  1. What pipe termination is that? Is there enough visible to tell? I guess it was probably installed before the drywall making the important parts hidden. All the rest of the potable plumbing is copper, and the toilet & sink valves are compression fittings.
  2. How should I replace the valve? Cut out some drywall below the box to access the termination? Any other way to do it I'm not thinking of? If I can undo the termination should I be able to remove the valve from the box and reuse the box?
  3. Assuming it's a copper compression fitting can I reuse the nut and ferrule on a new valve? I oddly have no experience working with compression fittings so I'm not sure how standard all the parts are.
 

Attachments

  • Icemaker.jpg
    Icemaker.jpg
    564 KB · Views: 19

Greenman

Lifer
Oct 15, 1999
20,487
5,232
136
If it's copper everywhere else then the valve most likely has an inlet that's pipe threads on the outside and sweat on the inside. The connection in either case will be tough to service. Before doing that, I'd take a stab at replacing the packing in the valve. If you end having to open the wall to replace the entire assembly, they do make a shark bite version that is slip fit. While I don't trust shark bite fittings, they appear to work.
 

herm0016

Diamond Member
Feb 26, 2005
8,413
1,034
126
i am going to disagree with greenman here, its going to be a compression fitting. my proposed steps:
turn water off, drain system
cut a larger hole in the bottom of the box
undo compression nut, remove ferrel and nut
clean pipe with emry cloth
install new 1/4 turn shark bite valve.

all the problems with SharkBite's i have seen, which is very few, have been due to poor surface prep or not getting the insertion depth correct.
 

Greenman

Lifer
Oct 15, 1999
20,487
5,232
136
i am going to disagree with greenman here, its going to be a compression fitting. my proposed steps:
turn water off, drain system
cut a larger hole in the bottom of the box
undo compression nut, remove ferrel and nut
clean pipe with emry cloth
install new 1/4 turn shark bite valve.

all the problems with SharkBite's i have seen, which is very few, have been due to poor surface prep or not getting the insertion depth correct.
Sharkbite's depend on an O ring to make the seal, so the longevity of the installation equals the longevity of the O ring. I don't like that in an inaccessible location. A mechanical seal, either threaded or sweat isn't much harder to install and gives me piece of mind.
I still think replacing the packing should be the first step, clearly it's leaking, it's replaceable, it's available, why not take the easy shot first?

I'll bet you a dollar that refer box isn't compression on the inlet side.
 
  • Like
Reactions: pcgeek11

Sukhoi

Elite Member
Dec 5, 1999
15,312
88
91
I actually just picked up the BrassCraft multi turn valve stem repair kit to keep around, so I'll grab another for this specific valve. Or is there a better brand I should use?

It sounds like I'm just going to need to stock a variety of quarter turn fittings in case the new valve packing doesn't fit. :D Definitely will grab a SharkBite (as last resort) and a compression, and probably a sweat. I think FIP too. The pic isn't the best but I recall those looking like hex flats against the bottom of the plastic box. And that fitting does look a lot like this one. For whatever reason they may have terminated the copper in MIP. Though if it's FIP I think I'm going to need to open the drywall anyway to monitor for leaks.

For a compression fitting must the ferrule be replaced?

If it's sweat and it doesn't leak in the first day or two is it normally fine forever? I've only ever done maybe three fittings, but they haven't leaked. Though those were loose pipe in a vise so I had access all the way around.

Finally, can anyone tell from the pics is the copper tube 1/4" or 3/8"? It looks like 1/4" to me. With a new fridge would you reuse it or replace it, and replace with new copper tube, stainless braided hose, or something else? It's well water so it's fairly hard with what seems like calcium. Not sure if soft copper or stainless/plastic hose tends to last longer.
 

drnickriviera

Platinum Member
Jan 30, 2001
2,420
205
116
The valves for boxes like that are usually special. They will have a long 2" or so male threaded section then a plastic nut comes from under the box to attach it to the box. like so
https://www.homedepot.com/p/EASTMAN-1-2-in-Sweat-Ice-Maker-Box-60232/205852290

if it is copper piping i'd bet it is sweated on. Rarely have i seen FIP or compression in the wall.

Tube to fridge would be 1/4". I'd just get the flex stainless.
 

herm0016

Diamond Member
Feb 26, 2005
8,413
1,034
126
cant go wrong with the soft copper that is there, at least in my opinion. otherwise stainless braided. should be 1/4 in.

let us know how it turns out.
 

jmagg

Platinum Member
Nov 21, 2001
2,041
376
126
The valves for boxes like that are usually special. They will have a long 2" or so male threaded section then a plastic nut comes from under the box to attach it to the box. like so
https://www.homedepot.com/p/EASTMAN-1-2-in-Sweat-Ice-Maker-Box-60232/205852290

if it is copper piping i'd bet it is sweated on. Rarely have i seen FIP or compression in the wall.

Tube to fridge would be 1/4". I'd just get the flex stainless.
Looks to me like this is the way for that application.


Greenman

Lifer
Oct 15, 1999
20,487
5,232
136
I actually just picked up the BrassCraft multi turn valve stem repair kit to keep around, so I'll grab another for this specific valve. Or is there a better brand I should use?

It sounds like I'm just going to need to stock a variety of quarter turn fittings in case the new valve packing doesn't fit. :D Definitely will grab a SharkBite (as last resort) and a compression, and probably a sweat. I think FIP too. The pic isn't the best but I recall those looking like hex flats against the bottom of the plastic box. And that fitting does look a lot like this one. For whatever reason they may have terminated the copper in MIP. Though if it's FIP I think I'm going to need to open the drywall anyway to monitor for leaks.

For a compression fitting must the ferrule be replaced?

If it's sweat and it doesn't leak in the first day or two is it normally fine forever? I've only ever done maybe three fittings, but they haven't leaked. Though those were loose pipe in a vise so I had access all the way around.

Finally, can anyone tell from the pics is the copper tube 1/4" or 3/8"? It looks like 1/4" to me. With a new fridge would you reuse it or replace it, and replace with new copper tube, stainless braided hose, or something else? It's well water so it's fairly hard with what seems like calcium. Not sure if soft copper or stainless/plastic hose tends to last longer.
Just to be clear, all of my comments have been about the connection inside the wall, where the supply hooks to the valve/box combo.
 
  • Like
Reactions: Sukhoi

Sukhoi

Elite Member
Dec 5, 1999
15,312
88
91
The valves for boxes like that are usually special. They will have a long 2" or so male threaded section then a plastic nut comes from under the box to attach it to the box. like so
https://www.homedepot.com/p/EASTMAN-1-2-in-Sweat-Ice-Maker-Box-60232/205852290

if it is copper piping i'd bet it is sweated on. Rarely have i seen FIP or compression in the wall.

Tube to fridge would be 1/4". I'd just get the flex stainless.

Good find - decent chance that's it. Likely what Greenman was envisioning as well. Hopefully can just repack it and be done. If that doesn't work and it is sweat I guess I should be prepared to add a nipple to get the new valve back up into the box since I'm going to have to cut a fair length off. I'm not willing to try soldering in such tight quarters.

Thinking about it more I suppose adding a nipple allows me to use a compression coupling since it'll be undamaged pipe below the cut, and avoid SharkBites completely.

I won't be doing the work until summer, but will try to remember to update the thread then!
 

drnickriviera

Platinum Member
Jan 30, 2001
2,420
205
116
Good find - decent chance that's it. Likely what Greenman was envisioning as well. Hopefully can just repack it and be done. If that doesn't work and it is sweat I guess I should be prepared to add a nipple to get the new valve back up into the box since I'm going to have to cut a fair length off. I'm not willing to try soldering in such tight quarters.

Thinking about it more I suppose adding a nipple allows me to use a compression coupling since it'll be undamaged pipe below the cut, and avoid SharkBites completely.

I won't be doing the work until summer, but will try to remember to update the thread then
Guess a couple ways to do it. If you didn't want to replace the plastic box. cut drywall under the box, cut copper say 6" below valve, remove nut from valve and pull it out the top. Reverse, sweat copper to valve then install to box, that way you don't melt the plastic box or nut. The connect to old copper however you want, sweat a coupling, compression, sharkbite.

If you did want to replace the box. Cut out drywall bigger so you can access studs for nailing flange. Get a sharkbite ice maker box, cut off copper as close to the valve as you can then push new box on that pipe. Box will be a bit lower than before.

Patching and mudding the drywall will take longer than the dang repair. Watch it be polybutylene in there and you'll have all the wrong tools and supplies :)
 

Sukhoi

Elite Member
Dec 5, 1999
15,312
88
91
I hadn't thought of sweating the nipple onto the valve outside the box. SO MANY OPTIONS. I don't have any kind of a vise here so I'll have to ponder if that's realistic to do. My channel locks aren't that long though maybe long enough if I have a helper hold them.

I am trying to keep the existing box to simplify things. At least it's behind the fridge so I don't have to make the drywall repair look pretty.
 

iRONic

Diamond Member
Jan 28, 2006
7,008
2,303
136
I've made a Junglevice(TM) in the field with two pairs of vice grips & my safety wire pliers before.
 

Micrornd

Golden Member
Mar 2, 2013
1,283
179
106
I'm just old school. Before I'd replace the valve and/or box and do drywall repair, I'd just rebuild the valve.
Shut off the water, remove the valve stem, replace the seat washer, clean the valve stem and replace the valve stem packing.
Most any ACE hardware store has the seat washers and stem packing and even at today's prices is less than $12 US.
Even if you've never rebuilt a valve, I'm sure you could google up a video showing you how to.
 
  • Like
Reactions: Sukhoi and iRONic